Architecture
Nelson is unlike many systems presently available in the market, and its architecture is discretely composable, and indeed, composability is an explicit design goal of the Nelson team. In practice this means that - unlike other monolithic systems - Nelson lets you bring your own CI, bring your own scheduler, bring your own credential management and so on.
With any new system, it is often useful to get a sense for how data is moving around the system, and the tradeoffs a given system is making. The following sections cover a few of these design choices.
Data Flow
Nelson splits the build->deploy->release phases into two major parts, each with distinctly different properties. First, the building of the containers and publishing to a staging registry. Second, the deployment, validation, and migration of traffic. The following diagram illustrates a high-level view of the first major part of the workflow.
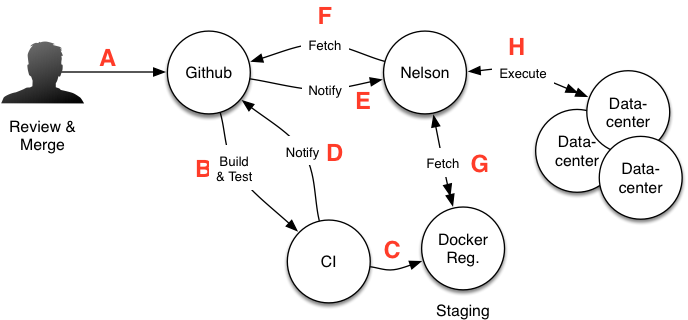 Workflow overview
There are a range of automated steps at every phase of the build and release pipeline; only the most minimal metadata is needed in the resulting GitHub Deployment to conduct a deployment. Nelson is agnostic to what language your application is built with or how it is tooled. You are free to integrate however you prefer, but we provide some tools to make doing so easy. For more information on CI integration, please see the section on Deployables.
Domain Redundancy
To run Nelson you will need access to a target “datacenter”. One can consider this logical datacenter - in practice - to be a failure domain. Every system should be redundant within the domain, but isolated from other datacenters. Typically Nelson requires the datacenter to be setup with a few key services before it can effectively be used. Imagine the setup with the following components:
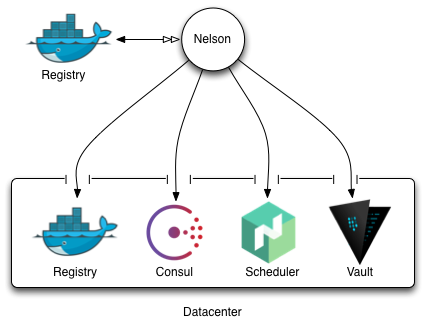 Failure domain
Logically, Nelson typically sits outside one of its target datacenters. This could mean it lives at your office next to your GitHub, or it might actually reside in one of the target datacenters itself. This is an operational choice that you would make, and provided Nelson has network line of sight to these key services, you can put it wherever you like. With that being said, it is recommended that your stage and runtime docker registries be different, as the performance characteristics of the runtime and staging registries are quite different. Specifically, the runtime registry receives many requests to pull images whilst deploying containers to the cluster, whilst the staging registry largely has mass-writes from your build system. Keeping these separate ensures that either side of that interaction does not fail the other.
Whatever you choose, the rest of this operator’s guide will assume that you have configured one or more logical datacenters. If you don’t want to setup a real datacenter, see Timothy Perrett’s GitHub to learn how to setup a Raspberry PI cluster which can serve as your “datacenter” target.
Availability
Whilst many systems authors today choose to adopt the complexity of high-availability, clustered systems, this is often done for the wrong reasons. Nelson is - by design - not high-availability, and avoids being in the “hot path” for runtime execution. This means that Nelson is operationally simpler than many of its competing systems, and with the correct supervision and a scale up approach, Nelson can reach way into the thousands of deployments a day range, without breaking a sweat.
Security
As Nelson was born from field experience, having a strong security story for runtime systems baked in was one of the top design goals. At a very high level, the security workflow for a deployment can be thought of like so:
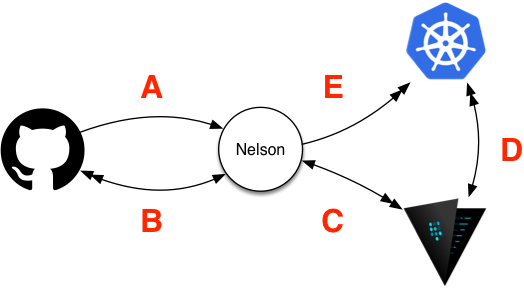 Security Workflow
When Nelson receives the inbound release webhook (A and B), the deployment workflow starts executing. From here, Nelson will generate the following:
C stack-specific policy that defines what secret paths can be read from the secure Vault storage system. This policy is unique and includes only the items that the stack needs to access - attempting to access anything else will be denied.
D Next, Nelson provisions a dynamic “auth role” for the scheduler in question. This “role” is later used at runtime as a part of the container identification / secure introduction workflow (read more about this on the Vault documentation site).
E After these items are provisioned Nelson will go ahead and launch the stack on the configured scheduler, which at runtime will then reach out to Vault and authenticate as the stack-specific role that was provisioned in steps C and D.
This may seem like quite a number of steps, but establishing trust in runtime systems is intrinsically very difficult (how do you get credentials, to get credentials?). With this frame, Nelson adopts an approach such that it can assume the absolute minimum possible privileges for any given stack container. Better still, if the resource you’re accessing (i.e. the secret material you are using) is from one of Vault’s supported dynamic secret backends - for example, AWS IAM - then whilst every stack is logically partitioned from every other, within that stack every single container (be it a single container or thousands of replicas) will all have entirely unique credentials. This reduces the attack surface area to an exceedingly small window: if a container gets compromised, the attacker has the time from when they gain access to the time when you notice it’s been compromised and redeploy the container - said attacker would not gain anything in perpetuity and would have to start their hack all over again.
One can even extend this further and build a zero-trust network by having every container use dynamically generated mTLS certificates, funneling all traffic via a service mesh like Envoy. This means that the user’s application can be “dumb” and make plaintext TCP connections, whilst the on-wire traffic is transparently encrypted with certificates that are container-unique.
Next Steps
- Learn about how Nelson allows seamless integration with any CI system using Deployables.
- Learn how Nelson enables operators to focus on enabling the rest of the organization via Nelson’s blueprints subsystem.