Contributing
Contributions to Nelson are very much welcome! If you’re considering contributing to the project, feel free to swing by the Gitter chat room to discuss the changes beforehand (perhaps someone else is already working on your issue!). Alternatively, please file an issue and a member of the Nelson team will endeavor to get back to you as soon as possible. The sections below outline some of the conventions and useful information for Nelson developers.
Development
Nelson is written in Scala, and built using SBT. You will need to install SBT locally before you can start working with the Nelson codebase. Please follow the install steps to get setup.
$NELSON_HOME. Whilst this variable does not need to be literally set in your shell, the author uses this notation to avoid confusing $NELSON_HOME/etc with system /etc for example.
To boot up Nelson locally, there are a handful of items that need to be setup beforehand. First, obtain a Personal Access Token for GitHub with the following permissions. Once you have this, add it to your environment with the GITHUB_TOKEN variable using ~/.bash_profile, or whatever file as appropriate for your shell of choice.
# the value here should be the personal access token that you got from GitHub
export GITHUB_TOKEN="XXXXXXXXXXXXXXXXXX"
Next, add a line to /etc/hosts such that you have a nelson.local domain pointing to your local loopback interface. This looks like:
127.0.0.1 nelson.local
This may seem like a strange modification, but it is required in order to have browsers like Chrome store cookies locally. As Nelson uses cookies for authentication, without this you won’t actually be able to maintain an active session.
This is the bare minimum required to run Nelson. You can then instruct Nelson to boot up by using the following command:
$ sbt
# once the interactive shell loads, run:
$ http/reStart
Nelson will then boot up and be running on http://nelson.local:9000.
Configuring an OAuth application for local Nelson development is covered in the operator guide section of the documentation. Unless you are working on specific components related to interaction with GitHub, this should not be needed.
If you need GitHub access locally, setup the OAuth application and then configure the following properties in $NELSON_HOME/etc/development/http/http.dev.cfg:
nelson.github.client-id = "<your value>"
nelson.github.client-secret = "<your value>"
# If you need GitHub enterprise, uncomment and set the following:
# nelson.github.domain = "github.yourcompany.com"
User Interface
When developing the UI, Nelson supports pointing its web directory to another path on disk to facilitate developing the UI with frontend-native tools. This can be altered by changing $NELSON_HOME/etc/development/http/http.dev.cfg:
# where are the assets located on disk, that Nelson
# will serve as its UI contents; this is for local development purposes
# only and should not be used in production.
nelson.ui.file-path = "/path/to/nelson/ui"
Note that Nelson can also be run in an entirely headless manner, using the following:
nelson.ui.enabled = false
This can be useful when developing certain types of UI, but largely can be ignored.
Dependencies
Technically, you can run Nelson locally without the other system dependencies running locally - some functionality will of course not work. If the feature you’re working on doesn’t need those systems, please be aware your logs will contain errors reporting that those dependencies are not running. To remove these errors, install and run the needed systems locally before booting Nelson.
Do be aware that you could also run these dependencies as containers but it can often become tricky with networking. This is something that is certainly possible to overcome, but it’s more hassle than most people want when getting setup, and so this guide assumes you are running binaries natively.
Kubernetes
Nelson is integrated with Kubernetes. You can optionally use it for development purposes, even if you do not use it in production. For local operation, the author proposes using minikube, or leveraging one of the cloud-hosted solutions like GKE, AKE or EKS.
As Kubernetes itself has a complicated authentication story, Nelson does not try to replicate that at all, and instead simply shells out to the kubectl command line application, which in turn uses the Kubernetes configuration defined by KUBECONFIG environment variable. In short, provided your kubectl is operating with the cluster you wish to use with Nelson no further external setup is required.
To instruct Nelson to use this local Kubernetes cluster, alter the configuration at $NELSON_HOME/etc/development/http/http.dev.cfg:
datacenters {
  local {
    infrastructure {
      scheduler {
        scheduler = "kubernetes"
        kubernetes {
          in-cluster = false
          timeout    = 10 seconds
          kubeconfig = "/path/to/kubeconfig"
        }
      }
    }
  }
}
This is all that’s needed to use a local Kubernetes configuration.
Nomad
Nelson is integrated with Hashicorp Nomad. You can optionally use it for development purposes, even if you do not use it in production. By default, the local development configuration assumes you’re running Nomad on the loopback address, 127.0.0.1. If you wish to point to a remote Nomad cluster, then you must set the following environment variables:
export NOMAD_ADDR=http://127.0.0.1:4646
Boot Nomad in a shell with nomad agent -dev and put it to one side. To instruct Nelson to use this local Nomad, alter the configuration at $NELSON_HOME/etc/development/http/http.dev.cfg:
infrastructure {
  scheduler {
    scheduler = "nomad"
    nomad {
      endpoint = "http://127.0.0.1:4646"
      timeout = 2 seconds
      docker {
        host = "registry.service.texas.your.company.com"
        user = "someuser"
        password = "dummypwd"
      }
    }
  }
}
If the docker container registry that you’re using requires authentication, please specify it here. If not, you can remove the user and password fields.
This is all that’s needed to use a local Nomad configuration.
Consul
Nelson is integrated with Hashicorp Consul for routing and runtime health information. If you do not need these features you can ignore this dependency. To enable Consul with Nelson, modify the configuration at $NELSON_HOME/etc/development/http/http.dev.cfg: in the consul config, update endpoint to be:
datacenters {
  local {
    infrastructure {
      consul {
        endpoint  = "http://127.0.0.8500"
        timeout   = 1 second
        acl-token = "XXXXXXXXX"
        username  = "XXXXXXXXX"
        password  = "XXXXXXXXX"
      }
    }
  }
}
Then, run the Consul binary with consul agent -dev.
Vault
Install Vault with brew install vault, or by downloading and installing here. Modify the Nelson config at $NELSON_HOME/etc/development/http/http.dev.cfg:
datacenters {
  local {
    infrastructure {
      vault {
        endpoint         = "http://127.0.0.1:8200"
        auth-token       = "xxxxxxxxxxxxxxxxxx"
        timeout          = 5 seconds
      }
    }
    policy {
      # Path under which credentials are stored for
      # resources.  Units will get read capability on each resource.
      # Supported variables: %env%, %resource%, %unit%
      resource-creds-path = "nelson/%env%/%resource%/creds/%unit%"

      # Path to your PKI backend. Optional. If specified, unit will get
      # create and update capabilities on ${pki-path}/issue
      # Supported variables: %env%
      pki-path = "pki/cloud/%env%"
    }
  }
}
Then, run the Vault binary with vault server -dev.
Promtool
To run tests, you must have promtool available on your path. Developers on a Mac may run this script to fetch promtool and install to /usr/local/bin:
./bin/install-promtool
If you prefer to install this binary manually, then please fetch it from the Prometheus site and install at your favorite location on your $PATH.
Conventions
There are a few conventions at play within the Nelson codebase:
JSONresponses from the API should usesnake_case. This is because not all client-side scripting languages (namely, JavaScript) can handle keys that have dashes.Any functions that are going to be called for user or event actions should reside in the
Nelsonobject and have aNelsonK[A]return value (whereAis the type you want to return). Functions in this object are meant to assemble results from various other sub-systems (e.g.GithubandStorage) into something usable by clients of the API.
Database
Nelson’s primary data store is a H2 database. This deliberately doesn’t scale past a single machine, and was an intentional design choice to limit complexity in the early phases of the project. With that being said, H2 is very capable, and for most users this will work extremely well. If Nelson were reaching the point where H2 on SSD drives were a bottleneck, you would be doing many thousands of deployments a second, which is exceedingly unlikely.
If you start to contribute to Nelson, then it’s useful to understand the data schema, which is as follows:
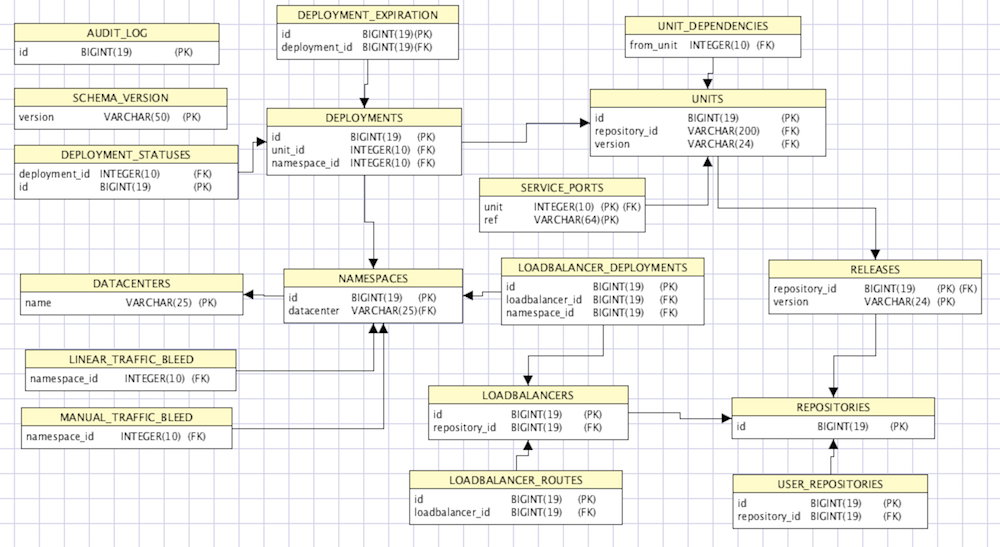
As can be seen from the diagram, Nelson has a rather normalized structure. The authors have avoided denormalization of this schema where possible, as Nelson is not in the runtime hot path so the system does not suffer serious performance penalties from such a design; in short it will be able to scale far in excess of the query and write load Nelson actually receives.
Known Issues
Upon receiving notification of a release event on GitHub, Nelson converts this to events published to its internal event stream (called
Pipeline).Pipelineand messages on it, are not durable. If Nelson is processing a message (or has messages queued because of contention or existing backpressure) and an outage / upgrade, or any issue that causes a halt to the JVM process, occurs, there will be message loss.Nelson does not have a high-availability data store. As mentioned in the database section, this is typically not a problem, but should be a consideration. In the future, the authors may consider upgrading Nelson so it can cluster, but the expectation is that scaling-up will be more cost-effective than scaling-out for most users. Nelson will currently eat up several thousand deployments a minute, which is larger than most organizations will ever reach.
Command Line
The Nelson CLI is useful for debugging the Nelson API locally. Particularly useful are the client’s --debug and --debug-curl flags. You can read about them in the client’s documentation. One option that you need to pay attention to for local usage is the --disable-tls flag on the login subcommand. To login to a local Nelson instance, you should run the following:
nelson login --disable-tls nelson.local:9000
It’s important to note that to use the API locally, a change to the development config at $NELSON_HOME/etc/development/http/http.dev.cfg is needed. Add the following line inside the nelson.github config:
organization-admins = [ "<your-github-handle-here>" ]
This ensures that when you login via the UI that you are specified as an admin and do not have limited access to the operations you can locally perform.
Documentation
There are a couple of options for testing documentation locally. First you need to install Hugo, which is a single, native binary and just needs to be present on your $PATH.
The most convenient method for viewing documentation locally is to run via SBT using the following command:
sbt docs/previewSite
This will open your default web browser with the documentation site, which is handy for locally viewing the docs. It does, however, not support dynamic reloading of pages when the source changes. Luckily this is supported by Hugo, and can easily be run with a script locally:
cd docs/src/hugo
hugo server -w -b 127.0.0.1 -p 4000
Hugo will automatically refresh the page when the source files are changed, which can be very helpful when one is iterating on the documentation site over time.